If you have ever built a frontend that calls a third-party API, you have faced this problem: the API requires a key, but putting that key in your JavaScript means anyone can see it.
The usual fix is to build a backend proxy — a small server that holds the key and forwards requests on your behalf. It works, but now you have a server to write, deploy, and maintain. For many projects, especially prototypes, side projects, and JAMstack sites, that is a lot of overhead for what should be a simple API call.
Mongrel.io lets you skip the backend entirely. It acts as a server-side proxy that injects your credentials at request time, so your API keys never appear in your frontend code.
The problem in detail
Here is what the insecure pattern looks like. You want to call a weather API, so you write something like this:
const response = await fetch("https://api.weather.example/forecast?city=Sydney", {
  headers: {
    "X-API-Key": "sk_live_abc123def456"
  }
});
const data = await response.json();
That API key is now visible to anyone who opens the browser’s network tab. Even if you move it to an environment variable like VITE_API_KEY or NEXT_PUBLIC_API_KEY, build tools inline those values into your JavaScript bundle. The key still ships to the browser.
The risks are real:
- Key theft — anyone can extract the key and use it from their own code
- Billing abuse — a stolen key can rack up charges on your account
- Rate limit exhaustion — automated abuse can burn through your quota, breaking the experience for legitimate users
How Mongrel.io solves this
Mongrel.io sits between your frontend and the external API. The flow looks like this:
- Your frontend calls your Mongrel.io endpoint — no API key in the request
- Mongrel.io receives the request and decrypts your stored credentials
- Mongrel.io calls the real API with your credentials injected server-side
- The response is returned to your frontend
Your API keys are encrypted with AWS KMS at rest and only decrypted inside the Lambda function at request time. You never write or deploy any backend code.
Step-by-step walkthrough
Here is how to set it up.
1. Create an API
In the Mongrel.io dashboard, start by creating an API. This is a container for your routes — think of it like a project. Give it a name and an optional description.
2. Create a route
Inside your API, create a new route. Give it a request path — this becomes the URL your frontend will call. For example, if you set the path to /weather/forecast, your endpoint will be available at https://your-subdomain.mongrel.io/weather/forecast.
3. Add an HTTP source
Add a source to your route and select HTTP as the type. Enter the URL of the external API you want to call, for example https://api.weather.example/forecast.
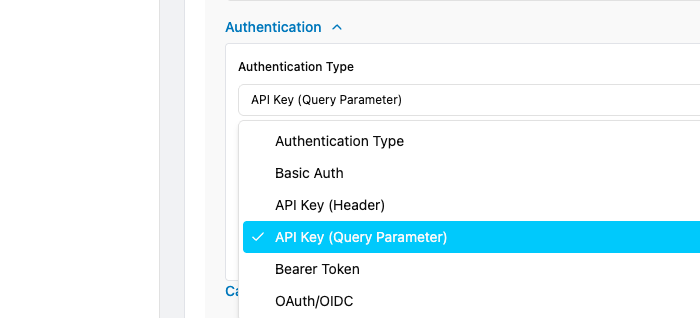
4. Configure authentication
This is where the magic happens. On your HTTP source, open the authentication section and select the type that matches what the external API expects.
Select the appropriate type and fill in your credentials. For an API key sent as a header, you would enter the header name and the key value.
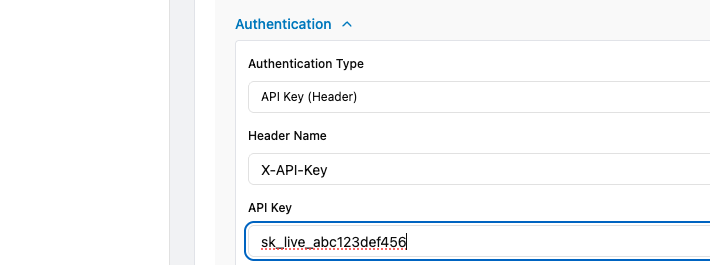
Mongrel.io encrypts these values immediately. They are stored encrypted and only decrypted at request time inside the Lambda function.
5. Publish the route
Once your route is configured, hit publish. Mongrel.io validates your configuration and makes the endpoint live.

6. Call it from your frontend
Now your frontend can call the Mongrel.io endpoint with no credentials at all:
const response = await fetch(
  "https://your-subdomain.mongrel.io/weather/forecast?city=Sydney"
);
const data = await response.json();
The API key never appears in your code, your git repo, or the browser network tab.
Supported authentication types
Mongrel.io supports five authentication methods, covering the most common patterns used by third-party APIs:
| Type | How it works |
|---|---|
| Basic Auth | Sends a username and password as a Base64-encoded Authorization header |
| API Key (Header) | Injects a key as a custom HTTP header (e.g. X-API-Key: your-key) |
| API Key (Query Parameter) | Appends a key to the URL query string (e.g. ?api_key=your-key) |
| Bearer Token | Sends a token in the Authorization: Bearer header |
| OAuth/OIDC | Performs a full client credentials flow — exchanges a client ID and secret for an access token, then injects it as a Bearer token |
For OAuth/OIDC, Mongrel.io handles the entire token lifecycle: exchanging credentials, caching tokens, and refreshing them when they expire. You just provide the token URL, client ID, client secret, and scope.
Before and after
Here is the comparison side by side.
Before — API key exposed in your frontend:
// Your API key is visible in the browser
const response = await fetch("https://api.weather.example/forecast", {
  headers: {
    "X-API-Key": "sk_live_abc123def456"
  }
});
After — calling through Mongrel.io:
// No API key anywhere in your frontend code
const response = await fetch(
  "https://your-subdomain.mongrel.io/weather/forecast"
);
Your API key never appears in your frontend code, your git repo, or the browser network tab.
Get started
Mongrel.io is free to get started. Create an account, set up your first route, and stop shipping API keys in your frontend.